Confluence plugin
- Former user (Deleted)
- Laura Muñoz (Unlicensed)
- Former user (Deleted)
Confluence is an enterprise wiki that makes it easy to create and share documents.
It also offers a powerful Plugin architecture that allows us to write plugins that change the way things work or add entirely new functionalities.
So this led us to the conclusion that Confluence was a good choice for a Test document repository.
Table of Contents
Installation
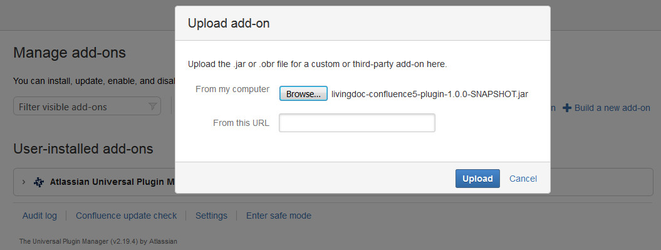
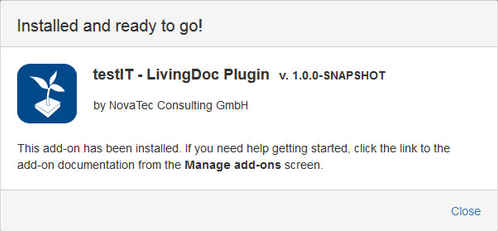
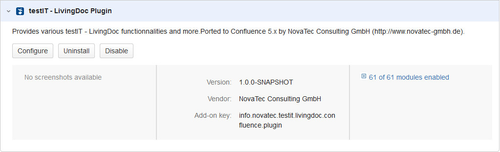
The installation of ![]() is no different from any other Confluence Add-On installation.
is no different from any other Confluence Add-On installation.
Simply upload your livingdoc-confluence-plugin-xx.jar via your Add-On Manager.
Upgrade
The upgrade of ![]() is no different from any other Confluence plugin upgrade.
is no different from any other Confluence plugin upgrade.
1. Uninstall your ![]() Plugin via your Add-On Manager
Plugin via your Add-On Manager
2. Re-Upload your ![]() Plugin via your Add-On Manager
Plugin via your Add-On Manager
Uninstall
If you really want to uninstall ![]() , simply uninstall your
, simply uninstall your ![]() Plugin via your Add-On Manager
Plugin via your Add-On Manager
Configure LivingDoc Confluence plugin
LivingDoc plugin setup
Confluence Server Base Url
If you expose the Confluence server to the outside world (other than localhost), make sure the Server Base URL of Confluence found is the external URL of the server.
This property is found under the General Configuration of the Administration of Confluence.
Note : If you change this URL when existing Spaces have been registered as LivingDoc project, you will need to refresh each project by clicking the Edit link then the Save link on the Space Registration form of the Space Administration or on the Project Management tab of the configuration of the LivingDoc plugin.
Here are the panes that will be accessible from your ![]() Toolbox plugin Configuration.
Toolbox plugin Configuration.
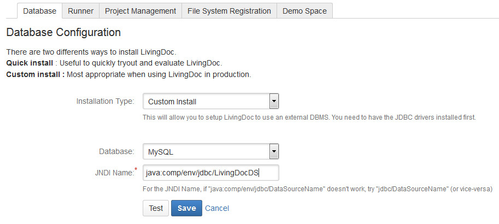
Database setup
![]() has its own database to store multiple data such as executions results, references and so on.
has its own database to store multiple data such as executions results, references and so on.
You will have two options:
- Quick install: A HSQL will be created locally. This setup is not suggested for a production environment, it was put in place for quick trial setup purposes.
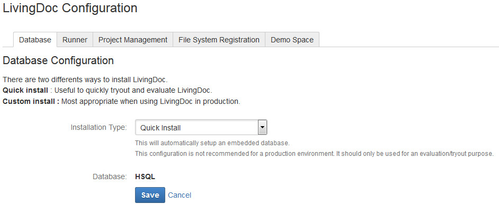
- Custom install: This will allow you to setup
 to use an external DBMS via a JNDI name.
Runner:
Your runners configuration pane.
You will be able to add/remove/update your runners.
We recommend creating an own remote runner because tests must be run outside of the confluence VM.
Java Runner
The most recent Java runner will be available by default. At each start of Confluence, we make sure there is a Java Runner matching the ![]() plugin version.
plugin version.
- Click on Add a new Runner
- Enter the name respectively IP of your server
- Enter the port of your server
- If your server runs in secure mode, enable the appropriate checkbox
- Enter the file path of your Runner-jar
- Click Save
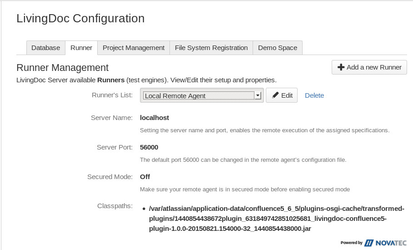
You can set different classpaths to the same Runner(e.g. different folder locations for Linux- and Windows-Users). Delimitate paths with a NewLine(Enter). During runtime every non existing path will be ignored.
Please ensure the data consistency of two or more Runners of the same name and package but a different and existing path. The easiest way to achieve this, is to keep your project up-to-date via version control systems like Git or Subversion.
Project Management (register a space to LivingDoc):
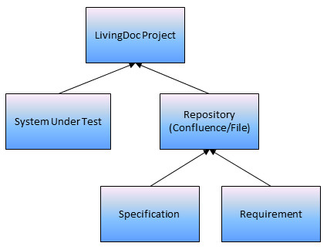
Goal of the registration
The goal of the repository registration is to regroup available specifications and requirements repositories under a single common ![]() project so that, when linking specifications to requirements, we can concentrate on related repositories. Here is an overview of the domain:
project so that, when linking specifications to requirements, we can concentrate on related repositories. Here is an overview of the domain:
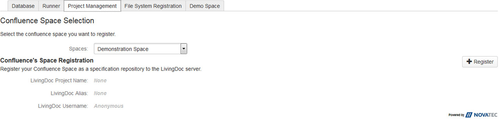
How to register a repository
To register your repository to ![]() server, follow these steps:
server, follow these steps:
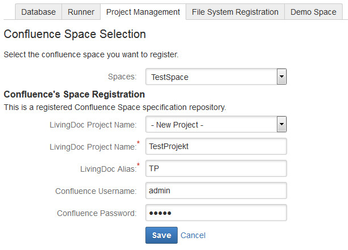
- Select the Space which you want to register, then click Register.
- Select the project to which you want to associate your repository to or choose New Project.
- Enter the Project name if you want to register a new project
- Enter the alias to identify your Confluence Space (i.e. PROJECTNAME).
- In order to restrict access, enter the username and password of a Confluence user. This restriction will be applied to Confluence and any other plugins accessing or executing the executable specifications.
- Click Save.
- From the list, select a system under test, if any available.
- If no one is available choose Add a new System under Test
- Enter the name of your System under Test. It don't has to be the project name of your SuT.
- Select the Runner you have specified in step 2.1.2
Enter the Classpath, where your LivingDoc-Classes(Fixtures) can be found
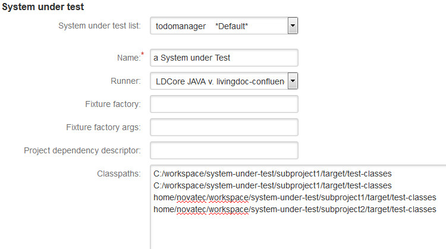
You can set different classpaths to the same project(e.g. different folder locations for Linux- and Windows-Users). Delimitate paths with a NewLine(Enter). While executing tables every non existing path will be ignored.
Please ensure the data consistency of two or more classes of the same name and package but a different and existing path. The easiest way to achieve this, is to keep your project up-to-date via version control systems like Git or Subversion.
How to migrate a repository
If you have upgraded LivingDoc from v1.3 to a newer version maybe is necessary to migrate the space in order to add the LivingDoc Header to all specifications. After register a repository a Migrate space button appears in the right side of the window.
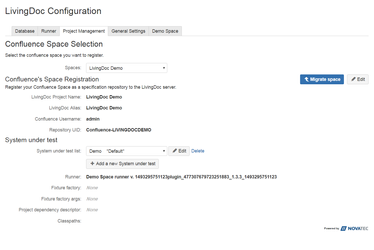
After click on it you can see all pages that will be updated.
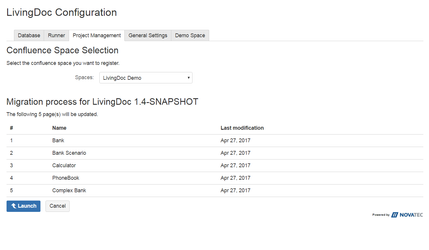
Then you can press on Launch. Done, your space has been migrated.
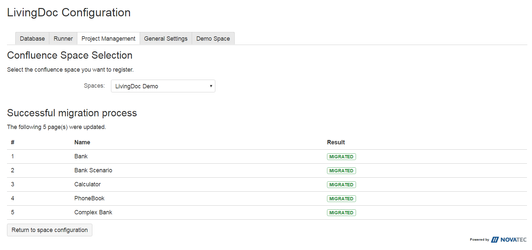
After migrate only specifications with LivingDoc Header enabled will be migrated. In case you need to execute one which was not a specification you should add a Page Macro manually.
Confluence Space setup
Using LivingDoc theme (Theme is removed since v1.3.4, please use LivingDoc Page Macro)
The Theme is a plug-and-play plugin giving access to all ![]() functionalities once it has been set.
functionalities once it has been set.
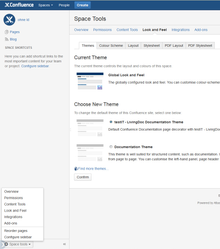
You can set the ![]() Theme from the Space admin panel or Global admin panel.
Theme from the Space admin panel or Global admin panel.
The drawback of using the Theme is that you will not be able to customize your layouts (e.g. page, space, template) or, if already customized, your customization will be ignored.
Two themes are available.
- Select the Space you want to apply LivingDoc
- Select "Space tools" (bottom left)
- Select "Look and Feel"
- Select testIT - LivingDoc Documentation Theme. It provides the LivingDoc color palette and overrides the default ( or custom) page layout.The page layout automatically includes:
- the LivingDoc header (Execute button and reference list at the top of the page)
- the LivingDoc body (allows to print out test results)
- Select "confirm"
Caution with the LivingDoc theme
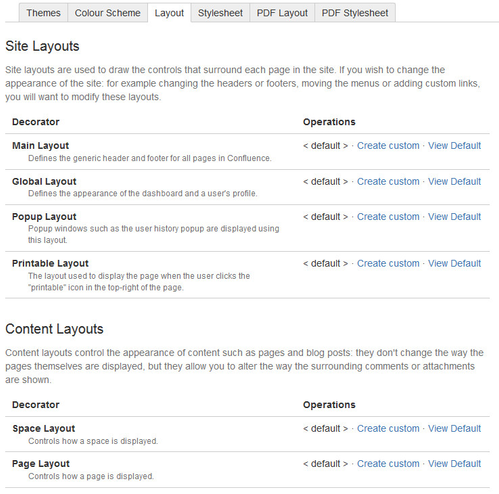
We cannot guaranty the behavior of the theme between Confluence upgrades. We do not have control on the default page layout of Confluence. This one may vary from a version to another. We advise you to manually configure your page layout. See Confluence Plugin Setup.
Manual configuration
First, you need to add the following to your Page Layout :
Further Configuration
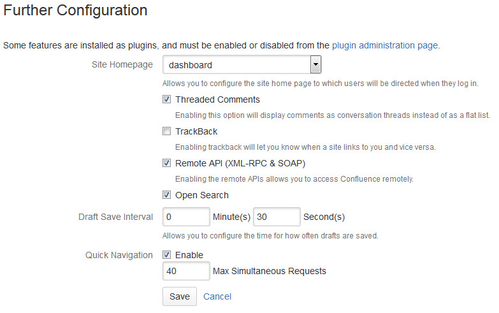
To allow remote access to the the ![]() addon, it is necessary to activate the Remote API. Go to the menu Further Configuration of your confluence installation and check the box next to Remote API (XML-RPC & SOAP).
addon, it is necessary to activate the Remote API. Go to the menu Further Configuration of your confluence installation and check the box next to Remote API (XML-RPC & SOAP).
Use
Add a template page executable
As you might have already noticed, in versions previous to 1.4.x, pages in ![]() registered spaces have a checkbox labeled LivingDoc enabled. Checking it will automatically register the document in the server. The default System Under Test will be automatically associated to your newly executable page.
registered spaces have a checkbox labeled LivingDoc enabled. Checking it will automatically register the document in the server. The default System Under Test will be automatically associated to your newly executable page.
Since v1.4.x pages in ![]() registered spaces should have a Page Macro inserted to execute the specification.
registered spaces should have a Page Macro inserted to execute the specification.
LivingDoc Specification template (since v1.4.x)
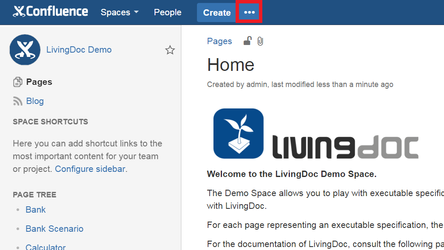
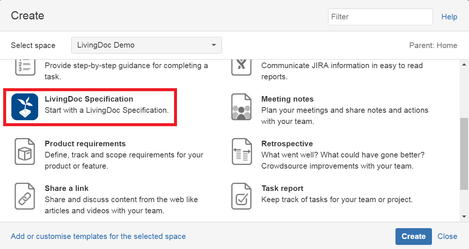
Over the three points in the button "Create" in Confluence you can create an empty LivingDoc Specification page with the LivingDoc Header.
Choose "LivingDoc Specification".
After save you can see a page with the Livingdoc header.

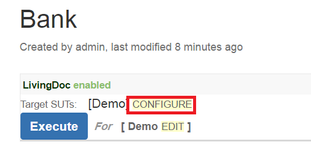
Configure your executable page
You might want to associate your page to other Systems Under Test. To do so, click the Configuration button.
You can now remove or add System Under Test associations. This is important if you want the livingdoc-labels or livingdoc-children macro to select your page.
Executing your page
You can now Execute your page. Next to the Execute button you will find which System Under Test will be involved. If you need to select another System Under Test, click the Edit button and select the desired System Under Test. The dropdown list only contains the Systems Under Test configured in step I.

Getting version information
You will see in the right-hand side of your ![]() header the version information of your page.
header the version information of your page.
There is two possible states:
- Implemented indicates that the specification has committed source code that verifies all its examples.
- Working indicates that the document has been updated since the last Implemented state.
Both states are executable.
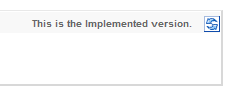
The most recent version is the Implemented version
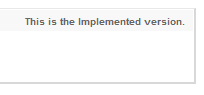
The Implemented version
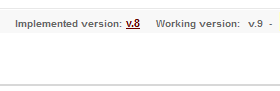
The most recent version differs from the Implemented version

Clicking on Set as Implemented will set the current version of the page as the Implemented version.
Reverting to a previous version
An easy revert feature is provided. Reverting will set the previous implemented version as the actual implemented version.
LivingDoc Confluence Macros
Page Macro (since v1.4.x)
Description: This macro enables the page as executable specification. It adds an execution button, SUT configuration, switching between working and implemented version and status bar for the execution results.
Syntax: {livingdoc-page-macro}
| EXAMPLE |
|---|
{livingdoc-page-macro}
|

Children Macro
Description: This macro can execute a batch of documents resulting from a page hierarchy.
Syntax: {livingdoc-children}
Optional parameters:
- all: Default --> false
If set to true, the complete hierarchy of the parent page will be included in the execution list.
Otherwise only the first-level children will be included. - spaceKey: Default --> Macro's residing space
You can specify a specific space for your parent page. - pageTitle: Default --> Macro's residing page
You can specify a specific title for the parent page. - title: Default --> blank
You can specify your own title. - expanded: Default --> false
You can ask for the list to be expanded on page load. - suts: Default --> All
You can narrow the list to specific Systems Under Test (1 or more; if more than one they must be separated by a comma). - group: Default --> PAGE
You can regroup all your macros in a page under a group name. (See Group Macro) - sort : Default --> Hierarchical sort
You can configure the way children are sorted. Choose Creation to sort by content creation dates, Title to sort alphabetically by titles and Modified to sort by modification dates (last date first). - reverse: Default --> false
You can reverse the sorting sequence. - openInSameWindow : Default --> false NEW in v2.1
You can control whether or not the link to the specification will open in the same window.
| EXAMPLE |
|---|
{livingdoc-children:spaceKey=BNKT|pageTitle=Example - Banking Account System|expanded=true}
|

Example Macro
Description: This macro allows you in the lazy mode to annotate tables and/or bullet lists that you do want to be processed as executable specifications within your executable documents.
Syntax: {livingdoc-example} your example table(s)/list(s) {livingdoc-example}
Optional parameters:
- title: Default --> blank
You can specify your own title. - bgcolor: Default --> NONE
You can change the background color of the Info section (ex.: red, blue, grey, lightgrey, green and hexadecimal colors).
If you omit to close your example section, the end of the document will be considered as the end of it
Historic Macro
Description: This macro creates a Chart image of the latest historic data of a page execution. The image created provide clickable area to display the specific execution result.
Syntax: {livingdoc-historic}
Optional parameters:
- pageTitle: Default --> Macro's residing page
The page title you want to show historic. - spaceKey: Default --> Macro's residing space
You can specify a specific space for your page. - sut: Default --> selected System Under Test of the page
The System Under Test name of the page - maxresult: Default --> 30
The maximum number of the latest historic data entry to show - width: Default --> 500
The width of the chart in pixels - height: Default --> 500
The height of the chart in pixels - border: Default --> false
Indicate to use a border for the chart image - showignored: Default --> false
Indicate to show the count of ignored tests - children: Default --> false
This parameter present a summary Chart containing an aggregation of execution result. If set to first, aggregation will be done for all first level children of the specified page. If set to all, the aggregation will be done with the complete hierarchy of the specified page. - labels: Default --> none
Labels to base the search when doing the aggregation of execution result of pages
Using the , as the label separation is equivalent to an OR query. So label1,label2 will retrieve all pages labeled by label1 OR/AND label2
Using the & as the label separation is equivalent to an AND query. So label1&label2 will retrieve all pages labeled by label1 AND label2
| EXAMPLE 1 |
|---|
{livingdoc-historic:pageTitle=Cell Decoration|
                       spaceKey=LIVINGDOCDEMO|
                       sut=Demo - PhoneBook|
                       maxresult=30|
                       width=700|
                       height=500|
                       border=true|
                       showignored=true}
|

Saving historic data from a local execution or a continuous build server
When executing specification locally or through a continuous build server, result are not saved automatically since they are disconnected from the Confluence plugin (only the specification page is retrieved).
Starting from version 2.2, we can post back the execution result using the repository implementation info.novatec.testit.livingdoc.runner.repository.LivingDocRepository. A new parameter must be added to the URL : postExecutionResult=true.
Example using the LivingDoc Maven Plugin :
<repositories>
        <repository>
            <type>info.novatec.testit.livingdoc.runner.repository.LivingDocRepository</type>
                <root>
                    <![CDATA[http://.../confluence/rpc/xmlrpc?handler=livingdoc1&sut=Java&includeStyle=false&postExecutionResult=true]]>
                </root>
                <name>livingdoc</name>
                <suites>
                    <suite>LivingDoc Confluence-LivingDoc</suite>
                </suites>
        </repository>
 </repositories>
Import Macro
Description: This macro allows you to import classes into your executable document without polluting it with undesirable and not meaningful user tables.
Syntax: {livingdoc-import: my.class.to.import | some.other.class.to.import | ... }
| EXAMPLE | |||
|---|---|---|---|
{livingdoc-import:my.class.to.import|some.other.class.to.import}
This will generate the following hidden table:
|
Include Macro
Description: This macro allows you to include pages content into Executable document allowing for example, to define a setup and a tear down page and include it in executable pages avoiding duplication.
Syntax: {livingdoc-include}
Mandatory parameters:
- pageTitle: The page title you want to include
Optional parameters:
- spaceKey: Default --> Macro's residing space
You can specify a specific space for your included page. - title: Default --> Macro's residing pageTitle
- expanded: Default --> false
You can ask for the included page to be expanded on page load.
| EXAMPLE |
|---|
{livingdoc-include:pageTitle=My Setup}
|

Info Macro
Description: This macro allows you to create tables and/or bullet lists that you do not want to be processed as executable specifications within your executable documents.
Syntax: {livingdoc-info} your body {livingdoc-info}
Optional parameters:
- title: Default --> blank
You can specify your own title. - bgcolor: Default --> NONE
You can change the backgound color of the Info section (ex.: red, blue, grey, lightgrey, green and hexadecimal colors).
This macro also allows you to insert into your executable document, other macros that generate tables or bullet lists.
If you omit to close your info section, the end of the document will be considered as the end of it
| EXAMPLE 1 | ||||
|---|---|---|---|---|
|
| EXAMPLE 2 | ||||
|---|---|---|---|---|
|
Labels search Macro
Description: This macro can execute a batch of documents resulting from a label search.
Syntax: {livingdoc-labels}
Optional parameters:
- spaceKey: Default --> None
You can narrow the label search to a specific space.
If none is specified, the available LivingDoc enabled spaces will be in a select list. - labels: Default --> None
You can pre-enter the labels to base the search on.
Using the , as the label separation is equivalent to an OR query. Therefore, label1,label2 will retrieve all pages labeled by label1 OR label2.
Using the & as the label separation is equivalent to an AND query. Therefore, label1&label2 will retrieve all pages labeled by label1 AND label2. - title: Default --> blank
You can specify your own title. - expanded: Default --> false
You can ask for the list to be expanded on page load. - suts: Default --> All
You can narrow the list to specific Systems Under Test (1 or more; if more than one they must be separated by a comma). - group: Default --> PAGE
You can regroup all your macros in a page under a group name. (See Group Macro.) - sort Default --> NONE
You can configure the way children are sorted. Choose Creation to sort by content creation dates, Title to sort alphabetically by titles and Modified to sort by modification dates (last date first). - reverse Default --> false
You can reverse the sorting sequence. - openInSameWindow Default --> false NEW in v2.1
You can control whether or not the link to the specification will open in the same window.
| Example |
|---|
{livingdoc-labels}
{livingdoc-labels:spaceKey=LIVINGDOCDEMO}
{livingdoc-labels:spaceKey=LIVINGDOCDEMO|labels=resolution & seed|expanded=true}
|


Advanced
LivingDoc logs
Activating the ![]() logs is helpful for the
logs is helpful for the ![]() support team.
support team.
To activate the ![]() logs, browse to the Logging and Profiling menu under the Confluence Administration screens. Under the Add New Entry, specify info.novatec.testit.livingdoc for the Class/Package Name, select the ALL (or DEBUG) level and then click the Add Entry button.
logs, browse to the Logging and Profiling menu under the Confluence Administration screens. Under the Add New Entry, specify info.novatec.testit.livingdoc for the Class/Package Name, select the ALL (or DEBUG) level and then click the Add Entry button.

Remote Agent
The ![]() remote agent is a small server that can be used to execute specifications from a
remote agent is a small server that can be used to execute specifications from a ![]() Server to another machine.
Server to another machine.
This Agent is an answer to many purposes like this examples :
- Your LivingDoc server is installed on a Unix machine and you need to execute .Net specifications on a Windows machine.
- You do not want to execute your specifications directly on your LivingDoc Server.
LivingDoc Remote Agent installation
The ![]() remote agent is a simple executable java application which is part of LivingDoc.
remote agent is a simple executable java application which is part of LivingDoc.
- Copy the remote agent Jar file on the machine where your Server will sends its remotes executions.
- To launch the remote agent, just double-click on the Jar file or by command line.
Command line to start the remote agent with default settings :
java -jar livingdoc-remote-agent-x.x-complete.jar
Command line to start the remote agent on a specified port :
java -jar livingdoc-remote-agent-x.x-complete.jar -port <MyPortNumber>
By default, the Remote Agent is listening on port 56000
Secured Mode
The communication between your ![]() server and your agent can be secured with SSL.
server and your agent can be secured with SSL.
Requirements
- 1. On Remote Agent
Your Remote Agent must be version 1.3 or higher
You must have a KeyStore properly configured see Configuring my Agent Keystore
- 2. On LivingDoc Server
Your LivingDoc Server must be version 1.3 or higher
You must have the agent certificate stored in your java cacerts file see Importing the Agent certificate
Enabling Secured Mode
On the remote agent
To enable Secured mode start the remote agent with this command line :java -jar livingdoc-remote-agent-x.x-complete.jar -secured -keystore <path to your keystore file>
- On LivingDoc Server
In Confluence get in LivingDoc Server Configuration, then Select the remote runner to be secured and just check the box "Secured Mode".
Configuration File
Starting with version 2.1, the remote agent can use a property file to specify parameters (instead of the command line parameters). By default, the remote agent will look for a property file remoteagent.properties in the current directory. You can also use the command line parameter -config [path of the configuration file] to override the default property file.
| Command line parameter | Configuration file entry | Default Value |
|---|---|---|
| -port | livingdoc.remoteagent.port | 56000 |
| -secured | livingdoc.remoteagent.secured=[true or false] | false |
| -keystore | livingdoc.remoteagent.keystore.file=[path of the keystore file] | * Mandatory if secured=true |
| livingdoc.remoteagent.keystore.password=[the password of the keystore file] | * Mandatory if secured=true and the keystore require a password |
The property livingdoc.remoteagent.keystore.password replace the command line input of the keystore password at remote agent startup.
Using SSL
HTTPS
You would need to setup your Web Container to server HTTPS requests. We recommend to use the following official guide from Atlassian for running an confluence installation over SSL or HTTPS:
https://confluence.atlassian.com/display/DOC/Running+Confluence+Over+SSL+or+HTTPS
Runner Configuration
Java Runner
You would need to tell your runner the location of the trustStore and the password on the command line (Optional if you imported the certificate in the JVM)
java -Djavax.net.ssl.trustStore=c:\livingdoc.cacerts -Djavax.net.ssl.trustStorePassword=[WIP:the password of the trustStore]
Confluence / Jira Repository Update
From Confluence / Jira, make sure the base url is using https on port 8443 (goto Adminstration / General Configuration).
- For each Confluence Space's Registration repository, click edit and update (without changing anything, the repository url will be updated using the actual base url)
- For each Jira Project Registration repository, click edit and update
Using the Eclipse Plugin
If you are using the Eclipse Plugin , you would need to perform the following steps :
Add information about the truststore and password to the eclipse.ini (Optional if you imported the certificate in the JVM)
-Djavax.net.ssl.trustStore=c:\livingdoc.cacerts
-Djavax.net.ssl.trustStorePassword=[WIP:the password of the trustStore]
- Change the Server's context path to use https on port 8443
FAQ
I keep having an error message when I try to create a new test case.
To be able to create a test case (a link between a requirement and a test document), you need a registered TEST repository such as a space from Confluence and a registered Requirement repository (such as a JIRA project) on the same ![]() project. Make sure a system under test has been defined for your
project. Make sure a system under test has been defined for your ![]() project .
project .
I do not see the LivingDoc header after adding a Page Macro to my page (since v1.4.x)
Make sure that your confluence space is register in your space settings.
I do not see the LivingDoc enabled checkbox
Make sure that your confluence space is assigned to the LivingDoc Documentation Theme in your space settings.
I click on the LivingDoc enabled checkbox but nothing happens.
This is because ![]() uses some AJAX calls and they cannot occur across multiple domains. Make sure that the domain you are using in the url of your browser matches the domain in the Server Base Url configured in Confluence's General Configuration. A common case of this is when
uses some AJAX calls and they cannot occur across multiple domains. Make sure that the domain you are using in the url of your browser matches the domain in the Server Base Url configured in Confluence's General Configuration. A common case of this is when ![]() is installed on a local machine. We suggest you use the name of your local machine (http: //mymachine:8080/accept) instead of localhost in the URL (e.g. http: //localhost:8080/accept).
is installed on a local machine. We suggest you use the name of your local machine (http: //mymachine:8080/accept) instead of localhost in the URL (e.g. http: //localhost:8080/accept).