For this Example it is assumed, that a configured LivingDoc Confluence Plugin is already set up. Which means database and runner have been installed and configured. A Confluence Space registered as LivingDoc Space is also required. As a first approach you can follow the basic configuration here.
Prepare your Java project
We recommend to create a new plain Java-Project with your favor IDE. In this example we named it "mysud" (sud=system under development).
There is no functional content required, except the fixture belowitself.
...
...
| language | java |
|---|
...
package info.novatec.mysud.fixture;

import info.novatec.testit.livingdoc.reflect.annotation.FixtureClass;

@FixtureClass({ "concatenate some words", "another alias" })
public class MyFirstHelloWorldExampleFixture {

    private String firstWord;
    private String secondWord;

	@Alias({"words concatenated"})
    public String concatenateTwoWords() {
        return firstWord + " " + secondWord;
    }

    public String getFirstWord() {
        return firstWord;
    }

	@Alias({"the 1st word"})
    public void setFirstWord(String firstWord) {
        this.firstWord = firstWord;
    }

    public String getSecondWord() {
        return secondWord;
    }

	@Alias({"the 2nd word"})
    public void setSecondWord(String secondWord) {
        this.secondWord = secondWord;
    }
}| Note |
|---|
Generally fixtures are glue-code that connect the functions or methods you want to test and the executable table inside Confluence. For this introduction we exceptionally implementing functional code instead of calling functions or methods. |
It is necessary to add the livingdoc-core module to your System under Test (SuT)SuD, allowing usage of LivingDoc-Classes like FixtureClass. Simply add the livingdoc-core JAR to your project, for example as a local Maven dependency. In case of this example it is asserted that the livingdoc-core-1.0.0.jar is located in [yourProjectfolder]/lib/"
...
| Code Block | ||
|---|---|---|
| ||
<properties>
   <project.basedir>home/novatec/workspace/mysud</project.basedir>
</properties>

<dependencies>
	<dependency>
        <groupId>info.novatec.testit</groupId>
        <artifactId>livingdoc-core</artifactId>
        <version>1.0.0</version>
        <scope>system</scope>
        <systemPath>${project.basedir}/lib/livingdoc-core-1.0.0.jar</systemPath>
    </dependency>
</dependencies> |
Create a executable table
Now that you have finished all Java configuration and implementation, let's have a look to your first executable table inside Confluence. Open up your Confluence Space, which you have registered as a LivingDoc Space beforehand and create a new page.
As usual imports are defined at first, your new page needs to know the location of your SuT SuD and its fixtures. To do that click on Insert and choose Other macros. Now search for "import" and you will find the "LivingDoc Import" macro.
...
Select the macro and enter "info.novatec.mysud.fixture" into the empty imports-field as shown below. We will use this package later for the example code.

| Note |
|---|
Please make sure you have specified the right classpath in your LivingDoc Plugin configuration. More informations about configure the LivingDoc Plugin can be found here. |
...
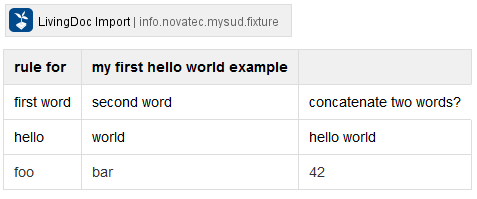
Now you can start writing your executable specification. To do this create a new table with at least 3 columns and 3 rows as shown in next picture.
Since it is a simple example code, a "rule for" interpreter will suffice. Write it down into the first cell. Next to it type in the name of your fixture. We recommend to use a meaningful word or sentence. Fixtures can be named with or
The next row defines your variables and your methods. You can write down the name of your variables and methods as they were defined or you give them meaningful and readable names.
Please ensure that your method name ends with a question mark.
Your first executable specification should looks like this:
Save your Confluence Page and activate it as a LivingDoc Page by clicking "LivingDoc enabled" at the top of your page.
Write a fixture
There has to be a code behind your executable table. Suitable methods will be started when you execute your table. The following fixture is one possible implementation for your first executable table. Please have a look to the class-, method- and variable-names and compare it with your executable table. You may have noticed the parameters next to the annotations @FixtureClass and @Alias. They are pseudonyms and are directly mapped to the classname and the methodnames which are called when the table will be executed. You can name your fixture "concatenate some words" or "another alias". It is also possible to use the whole classname or the classname without the postfix "Fixture". If you use the fixture-code above below you can use non case-sensitive identifier with or without whitespaces like this:
"myfirsthelloworldexample", "m yfirsthelloworldexamplefixture", "m y F irstHelloWorldExample", "my first hello world example", ...
You may have noticed the parameters next to the Annotation FixtureClass. They are aliases and are directly mapped to the classname. You can also name your fixture "concatenate some words" or "another alias".
The next row defines your variables (firstWord and secondWord) and your method concatenateTwoWords(). You can write down the name of your variables and methods under the same naming rules as your fixture class. It is also feasible to use "@Alias" to define aliases. Some possible syntax Some possible alternatives for the variable firstWord are:
"the 1st word", "firstWord", "first word", "fir stWord", . ..Please ensure that your method name ends with a question mark.
Your first executable specification should looks like this:
A second way to specify your table can be:

...
| Code Block | ||
|---|---|---|
| ||
package info.novatec.mysud.fixture;

import info.novatec.testit.livingdoc.reflect.annotation.FixtureClass;

@FixtureClass({ "concatenate some words", "another alias" })
public class MyFirstHelloWorldExampleFixture {

    private String firstWord;
    private String secondWord;

	@Alias({"words concatenated"})
    public String concatenateTwoWords() {
        return firstWord + " " + secondWord;
    }

    public String getFirstWord() {
        return firstWord;
    }

	@Alias({"the 1st word"})
    public void setFirstWord(String firstWord) {
        this.firstWord = firstWord;
    }

    public String getSecondWord() {
        return secondWord;
    }

	@Alias({"the 2nd word"})
    public void setSecondWord(String secondWord) {
        this.secondWord = secondWord;
    }
} |
| Note |
|---|
Generally fixtures are glue-code that connect the functions or methods you want to test and the executable table inside Confluence. For this introduction we exceptionally implementing functional code instead of calling functions or methods. |
Execute table
In case your plugin is correctly configured, clicking on "Execute" at the top of your confluence page should result in something similar to this:
...
The appropriate fixtures are described in Developer Guide (Automation Guide).